
How To Recover Unsaved Word Document On Mac WITHOUT AutoRecovery (The 2024 Definitive Guide)
It is the ultimate digital nightmare. You’ve been working on a crucial document for hours. Suddenly, Microsoft Word crashes, your Mac loses power, or you accidentally hit “Don’t Save.”
Your heart stops. You reopen Word, expecting the built-in AutoRecovery feature to pop up and save the day. But it doesn’t.
If you are reading this, standard methods have failed. You need advanced solutions.
This guide is specifically written for scenarios where the standard File > Open Recent > Recover Unsaved Documents method has not worked. Below are five proven, deeply technical methods to hunt down fragments of your work hiding in your Mac’s system files.
⚠️ CRITICAL FIRST STEP: STOP WORKING IMMEDIATELY
Before trying any method below, stop saving new files to your Mac.
When a file is “lost” or unsaved, its data often still exists on your hard drive in temporary spaces. If you continue to use your Mac, download files, or install new software, you risk overwriting that temporary data forever. The less you use your drive right now, the higher your chances of recovery.

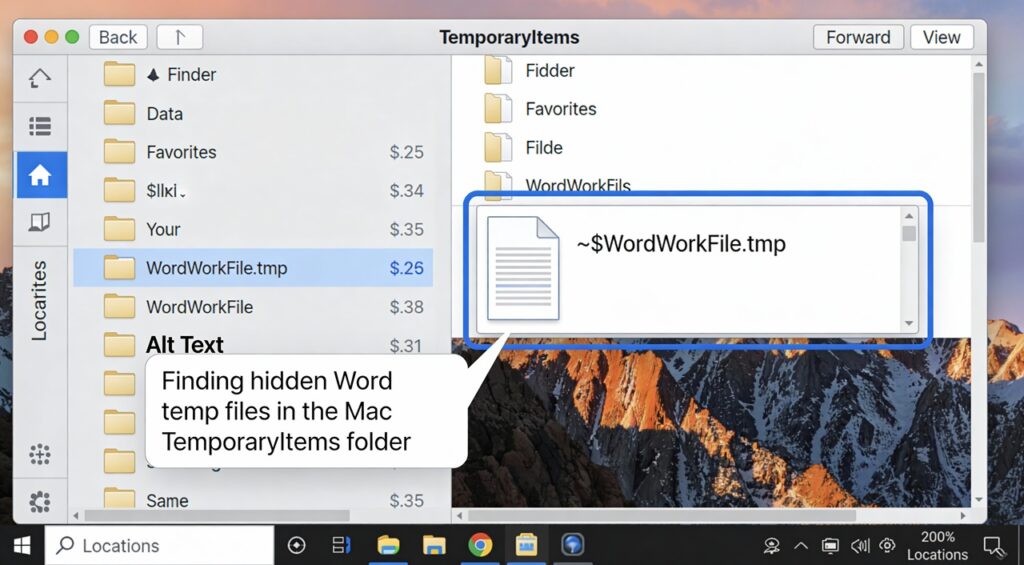
Method 1: The “TemporaryItems” Folder Hunt (Most Successful Method)
When Word is open, it creates temporary files to handle the data you are actively typing. Even if the main AutoRecovery fails, these temp files sometimes get left behind in a hidden system folder called TemporaryItems.
This is not a folder you can normally see in Finder.
Steps to access it:
-
Open Terminal. (Press
Cmd + Spacebar, type “Terminal”, and hit Enter). -
In the Terminal window, type the following command exactly and press Enter:
open $TMPDIR -
A Finder window will open showing a list of hidden folders. Look for a folder named TemporaryItems and open it.
-
Scan the contents carefully. You are looking for files that do not look like normal Word documents. They might:
-
Start with a tilde (
~) symbol. -
Have a
.tmpextension instead of.docx. -
Have names that look like gibberish letters and numbers.
-
-
If you find a suspicious file that matches the time your Word crashed, drag it to your Desktop.
-
Important: Do not try to open it by double-clicking. Instead, open Microsoft Word first, then go to File > Open, and select the file from your Desktop. You may need to change the file extension to
.docor.docxif Word won’t recognize it initially.
Method 2: Deep System Search in Finder (Including Hidden Files)
Standard Spotlight searches usually skip system files to avoid confusing the average user. We need to force Finder to look everywhere, including the hidden libraries where Word might bury a backup.
Steps to perform a Deep Search:
-
Open a new Finder window.
-
Navigate to “This Mac” on the left sidebar to ensure you are searching the entire drive.
-
In the search bar in the top right corner, type
.tmpor.asd(these are common extensions for Word backup files). -
Crucial Step: Just below the search bar, you will see a “Save” button and a
+sign. Click the+sign. -
A new search criteria line will appear. In the first dropdown menu that says “Kind”, click it and select “Other…”.
-
A list of attributes will appear. Search for “System files”, check the box next to it, and click OK.
-
Now, set the criteria to read: System files > are included.
-
Review the search results. Look for files modified around the time of the crash. If you find a candidate, copy it to your desktop and try opening it from within Word (as described in Method 1).

Method 3: The Terminal “Find” Command (For Advanced Users)
If Finder feels too clunky, the Terminal’s find command is a surgical tool that can scan your entire drive faster and more thoroughly for specific file types related to Microsoft Word buried deep in the OS.
Steps to run the command:
-
Open Terminal.
-
We need to search the entire root directory (
/) for files ending in.asd(Word’s native AutoSave extension) or temporary Word prefixes. -
Type this command and hit Enter (you will need to enter your Mac password):
sudo find / -name "*.asd" -print 2>/dev/null(Note: The
2>/dev/nullpart just hides “permission denied” error messages to keep the results clean.) -
Wait for the process to finish. If it lists any path ending in
.asd, copy that file path. Go to Finder, pressCmd + Shift + G(Go to Folder), paste the path, and retrieve the file.
Method 4: Check Time Machine (The Safety Net)
This method only works if you had Time Machine set up and running before the crash. Time Machine takes hourly snapshots of your system. It is possible it captured a version of your document right before Word failed, even if you hadn’t actively saved it.
Steps to retrieve via Time Machine:
-
Connect your Time Machine backup drive.
-
Open the folder where you intended to save the document (e.g., Documents folder or Desktop).
-
Click the Time Machine icon in the menu bar and select “Enter Time Machine”.
-
Use the timeline on the right edge of the screen to go back in time to just before the crash occurred.
-
Look in the Finder window. Do you see a version of your file there? If so, select it and click Restore.

Method 5: Third-Party Data Recovery Software (The Last Resort)
If the methods above (which rely on existing system files) fail, it means the file structure itself might be corrupted or deleted. At this point, you need software that can scan the raw sectors of your hard drive for “ghost” data.
Disclaimer: Most reliable recovery software requires a purchase to actually recover the file, but they usually allow you to scan for free to see if the file is retrievable.
Reputable options include:
-
Disk Drill for Mac
-
Stellar Data Recovery for Mac
-
EaseUS Data Recovery Wizard
How to use them generally:
-
Download and install the software (ideally onto an external drive to avoid overwriting data on your main drive).
-
Select your Mac’s main hard drive (usually “Macintosh HD”) as the target location.
-
Run a “Deep Scan.” This will take significant time.
-
Once finished, filter the results by file type (Documents > .docx / .doc).
-
Preview the found files. If the software shows a preview of your text, recovery is highly probable.
Summary: How to Ensure This Never Happens Again
The panic of losing a document is something you only want to experience once. Here is how to bulletproof your Word setup for the future:
-
Reduce AutoRecover Interval: In Word, go to Word > Preferences > Save. Ensure “Save AutoRecover info every…” is checked, and lower the time from the default 10 minutes down to 1 or 2 minutes.
-
Embrace the Cloud: The single best protection is using Microsoft OneDrive or SharePoint. When you save a file to these locations, the AutoSave switch in the top-left corner of Word turns On. This saves literally every single keystroke in real-time. It is far superior to AutoRecovery.
Did one of these advanced methods work for you? Let us know in the comments below which one saved your document!
Discover more from How To Get Rid Of Fruit Flies With Apple Cider Vinegar
Subscribe to get the latest posts sent to your email.